A looped presentation is a slide show that can be left to run automatically so it plays continuously. This is a great option for when you are exhibiting at a trade show or kiosk and want to showcase what you do, or if you are a photographer/artist and want to have a selection of your images running in the background etc.
In this step-by-step tutorial I use Microsoft PowerPoint 365, but I think earlier versions of PowerPoint will still have the same options that I use here. If you prefer to watch my video instead, then scroll to the bottom of this post :)
Step 1: Create the slides
Create the presentation as you would normally do in PowerPoint. If you want to have animations on the slides, set them up using the Animations tab on the ribbon. In this example I’m not using any animations, I just want each slide to be displayed for a set number of seconds before advancing to the next slide.

Once your slides are created, you can move on to the next step…
Step 2: Transitions
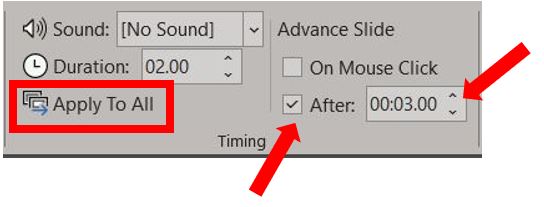
The next stage is to set up the timings of each transition. Make sure your first slide is selected, then click on the Transitions tab on the ribbon and go to the Timing section over on the right hand side…

Under Advance Slide, untick the On Mouse Click box and tick the After box, then use the arrows to specify how long (in seconds) you want the slide to be shown for, before advancing to the next one. For example, I want my first slide to be displayed for 3 seconds before moving to slide 2. If you wanted the same amount of time for all of the slides, then you can click Apply to All. In this example though I want different times for each slide, so I just repeat the process to the remaining slides…

Step 3: Looping
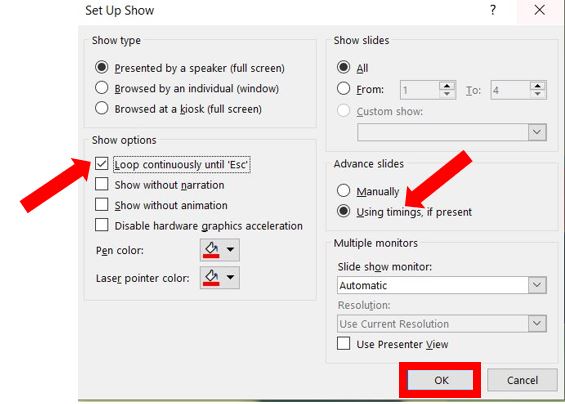
Once the timings are all set for each slide, the next thing is to set up the continuous loop. To do this, go to the Slide Show tab on the ribbon and in the Set Up section, click on Set Up Slide Show…

This opens up the slide show options. We want this slide show to be on a continuous loop so make sure to tick the Loop continuously until ‘Esc’ box – meaning it will run on a loop until the Escape key is pressed. You also need to make sure Using Timings, if present is selected so it will use the timings you set up in the previous step. Then click OK…

Your looped slideshow is now set up. To view it, you can either:
- go to the Slide Show tab on the ribbon, and click View from Beginning…

- OR, click on the Slide Show button in the toolbar at the bottom of the screen, over on the right hand side – this will play the slide show from the current slide…

- OR, press the F5 key on your keyboard to view it from the beginning.
And your presentation will play continuously until you press the Escape key.
